Blog Post 2: Static Configlets - Your First Step into Custom Configurations
Embarking on Your Configlet Journey
Now that we understand the power and potential of configlets, it's time to take our first step into the world of custom configurations. Static configlets are the perfect starting point for those looking to extend Apstra's capabilities. Let's dive in and create our first static configlet!
What Are Static Configlets?
Static configlets are the simplest form of custom configurations in Apstra. They contain fixed, predefined configuration commands that are applied consistently across selected devices. While they lack the dynamic flexibility of their more advanced counterparts, static configlets are ideal for straightforward, uniform configurations that don't require device-specific variations.
Creating Your First Static Configlet
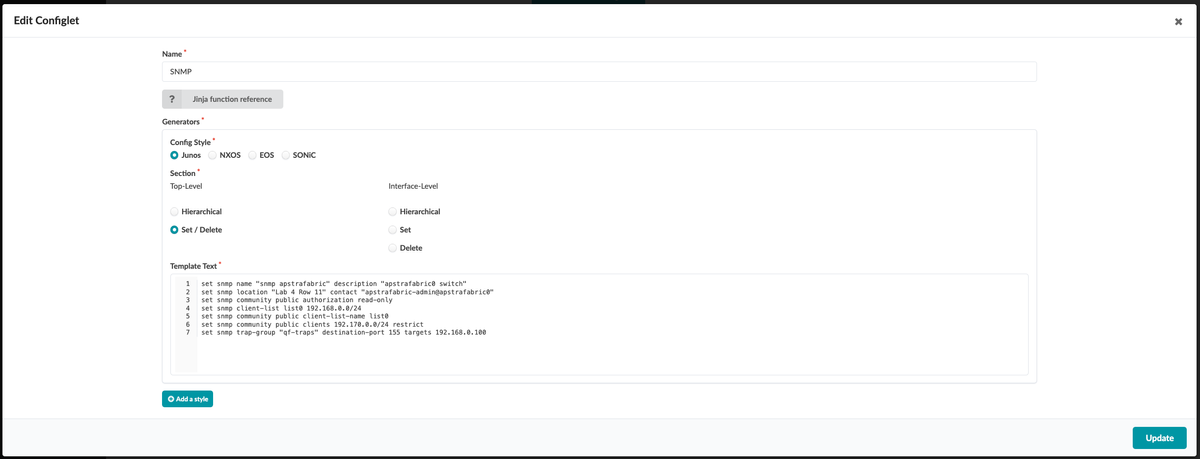
Let's walk through the process of creating a basic SNMP configuration using a static configlet. This example will demonstrate how to add a configuration that Apstra doesn't natively support.
-
Navigate to the Design Menu:
Configlets are created in the Design menu, not within a specific blueprint. This allows a single configlet to be deployed across multiple data centers if needed. -
Create a New Configlet:
- Go to
Design >> Configlets >> Create Configlet - Give your configlet a descriptive name, like "Basic SNMP Configuration"
- Go to
-
Enter Your Configuration:
For our SNMP example, you might enter something like this:set snmp community public authorization read-only set snmp name "SNMP Apstra Fabric" set snmp description "Apstra Fabric switch" set snmp contact "Apstra Fabric Admin at noc@company.com" -
Save Your Configlet:
Once you've entered your configuration, save the configlet. It's now ready to be applied to devices in your blueprints.
Applying Your Static Configlet
Creating the configlet is just the first step. To make it active, you need to apply it within a blueprint:
-
Navigate to your blueprint
-
Go to
Staged >> Catalog >> Configlets -
Import your newly created configlet
-
Choose where to apply it:
- System-wide: Apply to all devices or specific roles
- Interface-specific: Apply to certain interface types
-
Commit your changes to see the configlet in action
Best Practices for Static Configlets
- Keep It Simple: Static configlets are best for straightforward, uniform configurations.
- Use Clear Naming: Give your configlets descriptive names for easy management.
- Comment Your Code: Add comments to explain the purpose and function of your configlet.
- Test Thoroughly: Always validate your configlets in a non-production environment first.
The Power of Simplicity
While static configlets may seem basic, they're incredibly powerful for consistent, wide-reaching changes. They're the perfect tool for configurations that you want to apply uniformly across multiple devices or even multiple data centers.
Looking Ahead
In our next post, we'll explore the exciting world of dynamic configlets. We'll learn how to create configlets that adapt to different devices and scenarios, truly unlocking the full potential of Apstra's customization capabilities.
Stay tuned to transform your network management with the power of Apstra configlets!


Comments ()